This song had me singing along the very first time I heard it on my car stereo. Then I saw the vid and now all I want to do is hightail it to the beach. Anyone coming for the ride?
Monday, December 6, 2010
Friday, December 3, 2010
Friday Lunchbox #18
Today's lunchbox:
Morning Tea: Seaweed rice crackers and mix of craisins (dried cranberries) and sultanas.
Lunch: Chicken, sweetcorn and green capsicum cream cheese pinwheels with fresh fruit mix of green grapes, red grapes, blueberries and strawberries.
Drink: Iced water
The pinwheels are made with mountain bread which is a type of flat bread - simply spread your chosen filling on, roll up and slice into bite size pieces. They are a great party finger food too.
Miss Six will be finishing school for summer holidays next Thursday so this is the last Friday Lunchbox for quite some time. I think I have done what I set out to do when I started this series - to inspire myself out of the lunchbox boredom I was getting into! I'm finding it much more fun now and a whole lot easier to be thoughtful about what goes into them on a daily basis. I really hope I've inspired you too!
Have a brilliant weekend, everyone : )
Wednesday, December 1, 2010
How To Make A Terrarium
I've been wanting to make some terrariums for ages after finding some fabulous old bottles complete with glass stoppers at a local thrift store. (Those are the two at the back. The one at the front is an old coffee bottle with a plastic base on the stopper)
I've also been inspired by some beauties I've seen on the internet (apparently they were all the craze overseas a few years ago! How the heck did I miss that?) and the universe was definately telling me it was meant to be when I discovered this old book straight out of the 70's in my Mum's huge bookshelf.
I just love the line drawings and diagrams in it. They make me want to draw similar things and maybe even break out my colour pencils or watercolours. Which completely reminds me of Geninne's blog and the beautiful paintings of terrariums which she creates.
So if you'd like to create a terrarium of your own, there are a few things you'll need.
Glass containers (if they are small, make sure they are shallow enough that you reach and manipulate what's inside with your fingers, if they are tall, make sure your hand can fit through the opening!)
Pebbles or small rocks
Larger pebbles, shells, wood pieces, plastic animals - whatever takes your fancy to accessorise your terrarium
Charcoal (garden supply or aquarium supply shops will have this)
Peat or Sphagnum Moss (optional)
Potting mix
Small plants
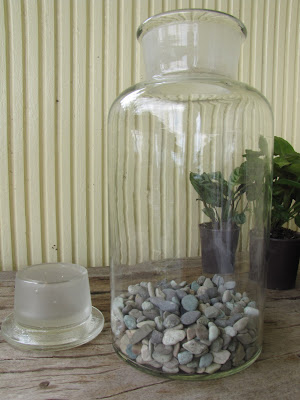
Make sure your chosen container is nice and clean then put a thin layer of pebbles down. If you have a tall jar (like I did) make a funnel from paper and shoot them straight down into the bottom. This totally stops you from freaking out that the jar is about to break cause the pebbles are bouncing around like kids on tartrazine.
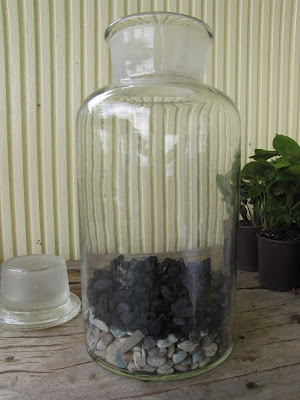
Add a thin layer of charcoal. This will stop any nasties from developing as your terrarium matures into it's own self sufficient environment.
Now you have two choices. You can either go straight into adding the potting mix or you can put down a layer of moss. I chose to use some sphagnum moss as I really wanted a striking layered effect in the soil part of my terrarium. But it certainly won't hurt your terrarium if you decide to leave it out.
So, sphagnum moss...
Then soil. Be careful to keep your layers thin. Mine in the picture above are a little too thick and there ended up being hardly any room for the plants. I had to tip the lot out, sort it through (which took forever) and redo it all with thinner layers in the picture below. Much better!
Now the fun part - plants!
I used my hand in the bottle to get the plants into position and then a skewer to help move the soil and other decorative items around. This whole process took a bit of patience in getting it looking exactly how I wanted it to be, so take your time. You could also use a chopstick, long surgical tweezers or a long handled spoon to help with this part. I also used a spray bottle to squirt down any of the dirt which I happened to flick up onto the sides and then a tissue wrapped around the end of the skewer to clean down the inside of the glass when I was finished. Be careful not to overwater your terrarium - the water does not drain away like in a normal garden and you don't want to drown your plants.
Love that little snaily shell.
For now they are sitting on my side table in our living area, however they are eventually destined to end up on my craft room windowsill once I have redecorated that area. I heart them very much!
I've also been inspired by some beauties I've seen on the internet (apparently they were all the craze overseas a few years ago! How the heck did I miss that?) and the universe was definately telling me it was meant to be when I discovered this old book straight out of the 70's in my Mum's huge bookshelf.
I just love the line drawings and diagrams in it. They make me want to draw similar things and maybe even break out my colour pencils or watercolours. Which completely reminds me of Geninne's blog and the beautiful paintings of terrariums which she creates.
So if you'd like to create a terrarium of your own, there are a few things you'll need.
Glass containers (if they are small, make sure they are shallow enough that you reach and manipulate what's inside with your fingers, if they are tall, make sure your hand can fit through the opening!)
Pebbles or small rocks
Larger pebbles, shells, wood pieces, plastic animals - whatever takes your fancy to accessorise your terrarium
Charcoal (garden supply or aquarium supply shops will have this)
Peat or Sphagnum Moss (optional)
Potting mix
Small plants
Make sure your chosen container is nice and clean then put a thin layer of pebbles down. If you have a tall jar (like I did) make a funnel from paper and shoot them straight down into the bottom. This totally stops you from freaking out that the jar is about to break cause the pebbles are bouncing around like kids on tartrazine.
Add a thin layer of charcoal. This will stop any nasties from developing as your terrarium matures into it's own self sufficient environment.
Now you have two choices. You can either go straight into adding the potting mix or you can put down a layer of moss. I chose to use some sphagnum moss as I really wanted a striking layered effect in the soil part of my terrarium. But it certainly won't hurt your terrarium if you decide to leave it out.
So, sphagnum moss...
Then soil. Be careful to keep your layers thin. Mine in the picture above are a little too thick and there ended up being hardly any room for the plants. I had to tip the lot out, sort it through (which took forever) and redo it all with thinner layers in the picture below. Much better!
Now the fun part - plants!
I used my hand in the bottle to get the plants into position and then a skewer to help move the soil and other decorative items around. This whole process took a bit of patience in getting it looking exactly how I wanted it to be, so take your time. You could also use a chopstick, long surgical tweezers or a long handled spoon to help with this part. I also used a spray bottle to squirt down any of the dirt which I happened to flick up onto the sides and then a tissue wrapped around the end of the skewer to clean down the inside of the glass when I was finished. Be careful not to overwater your terrarium - the water does not drain away like in a normal garden and you don't want to drown your plants.
For now they are sitting on my side table in our living area, however they are eventually destined to end up on my craft room windowsill once I have redecorated that area. I heart them very much!
Subscribe to:
Comments (Atom)


