Today at school drop off time, all the little girls in my daughter's class were fascinated by a small snaily fellow wandering along the seating.
After I came home and was writing out my groceries list, this appeared from the end of my pen...
I miss drawing.
I need to make time to do it more often.
Showing posts with label My Creative Space. Show all posts
Tuesday, November 2, 2010
Friday, October 22, 2010
No Friday Lunchbox Today...Sad Face
So, I was really hoping my blog would go viral but instead, I have.
You guessed it, I'm sick. Bleh. Hopefully by next week, yours truly will have returned to her regular programming but until then here's a sneak peak of one of my current projects. I hope you have a lovely weekend. I'm going back to bed.
Labels:
Blue,
Colours,
Craft,
Crochet,
Friday Lunchbox,
My Creative Space
Monday, October 11, 2010
Crochet Update
Before the school holidays, I finally finished my last granny square for the throw blanket I am making for Miss Five. Here they are...
All one hundred and sixteen! I didn't do any crochet over the holidays but now they are all laid out on the loungeroom floor and I am painstakingly slip-stitching them together. It feels like it's taking forever but I keep reminding myself that it takes time to sew love into every stitch and you can't get that out of a mass made product from China.
And because it's fun to add to the chaos by having more than one project going at anytime (am I the only person who does that?) I decided to teach myself how to ripple! I've noticed lots of ripple and zigzag blankets happening in the crochety world of late and they all look pretty swish. And since my nextdoor neighbour is pregnant I thought it would be a fabulous opportunity to ripple a baby blanket - something of a size that's not too daunting and that I'd be able to whip up a whole lot quicker than Miss Five's throw.
The lovely Hilary from here gave me a link to a marvelous rippley tutorial from over here. I had seen this tute ages ago but forgot to bookmark it and then couldn't remember where it was. So thanks, Hilary!! (You should definately check out Hilary's awesome rippley goodness, I love the colours she is using)
Anyway, it seemed fairly straightforward with a couple of things I needed to learn (increasing and decreasing stitches) so I started on a small sample. To begin with you have to chain a certain amount of stitches and then work your next row of stitches into the chain.
Well, I am not one for swearing (there are way too many other delightful words to use) and my hubby and close friends will tell you that when I swear they come running cause I clearly have good cause. But working the first row of stitches into the chain? That was an absolute bee eye tee cee aitch, let me tell you!! To prove my point, here is my first attempt...
Gracious! What the heck is that thing?? My tension is all over the shop and it doesn't even come close to resembling anything remotely ziggy or zaggy. And getting my hook into each chain was absolute murder. I came very, very close to ending up the same way Pip from Meet Me At Mikes did when she first attempted learning to crochet. She cried, people. And I now understand completely why she did that. I do.
But instead of succumbing to the tears, I blinked a lot, cut that attempt off, went and had a cup of tea, came back, took a really deep breath, exhaaaaaaaaaaaaaled and began again. This time I went awfully slowly and carefully, watching my tension and being really, really patient with those chains. And look what happened!!
It's not perfect but it's much better, isn't it? It's quite ziggy. And the second row was a breeze. I can definately handle that problematic chain knowing how easy the rows afterwards will be
So after a little more practice I have some lovely white, navy and two nice blues to start rippling with (yes, my neighbour is having a boy). Wish me luck!
All one hundred and sixteen! I didn't do any crochet over the holidays but now they are all laid out on the loungeroom floor and I am painstakingly slip-stitching them together. It feels like it's taking forever but I keep reminding myself that it takes time to sew love into every stitch and you can't get that out of a mass made product from China.
And because it's fun to add to the chaos by having more than one project going at anytime (am I the only person who does that?) I decided to teach myself how to ripple! I've noticed lots of ripple and zigzag blankets happening in the crochety world of late and they all look pretty swish. And since my nextdoor neighbour is pregnant I thought it would be a fabulous opportunity to ripple a baby blanket - something of a size that's not too daunting and that I'd be able to whip up a whole lot quicker than Miss Five's throw.
The lovely Hilary from here gave me a link to a marvelous rippley tutorial from over here. I had seen this tute ages ago but forgot to bookmark it and then couldn't remember where it was. So thanks, Hilary!! (You should definately check out Hilary's awesome rippley goodness, I love the colours she is using)
Anyway, it seemed fairly straightforward with a couple of things I needed to learn (increasing and decreasing stitches) so I started on a small sample. To begin with you have to chain a certain amount of stitches and then work your next row of stitches into the chain.
Well, I am not one for swearing (there are way too many other delightful words to use) and my hubby and close friends will tell you that when I swear they come running cause I clearly have good cause. But working the first row of stitches into the chain? That was an absolute bee eye tee cee aitch, let me tell you!! To prove my point, here is my first attempt...
Gracious! What the heck is that thing?? My tension is all over the shop and it doesn't even come close to resembling anything remotely ziggy or zaggy. And getting my hook into each chain was absolute murder. I came very, very close to ending up the same way Pip from Meet Me At Mikes did when she first attempted learning to crochet. She cried, people. And I now understand completely why she did that. I do.
But instead of succumbing to the tears, I blinked a lot, cut that attempt off, went and had a cup of tea, came back, took a really deep breath, exhaaaaaaaaaaaaaled and began again. This time I went awfully slowly and carefully, watching my tension and being really, really patient with those chains. And look what happened!!
It's not perfect but it's much better, isn't it? It's quite ziggy. And the second row was a breeze. I can definately handle that problematic chain knowing how easy the rows afterwards will be
So after a little more practice I have some lovely white, navy and two nice blues to start rippling with (yes, my neighbour is having a boy). Wish me luck!
Tuesday, August 31, 2010
Tuesday, August 24, 2010
Crochet Rocks! Yes It Does.
Have you seen these yet?
I've been enamoured with them ever since seeing them for the first time and quite often since, on Geninne's beautiful blog.
So here's my own first attempt at one.
I didn't use a pattern and since I only know how to chain and treble stitch, that's what I did.
Perhaps not as exquisite as Margaret Oomen's beauties but I think I did ok. And it's just perfect for posing with an illustration from a beautiful vintage book of Australian wildflower illustrations by Patricia Weare. I discovered this book in a thrift store not so long ago - it was a nice find!
I think this one will be destined for a lovely little display on my craft room window sill. I have two more similar pebbles and some different coloured thread...but perhaps I should learn a few more stitches first.
I've been enamoured with them ever since seeing them for the first time and quite often since, on Geninne's beautiful blog.
So here's my own first attempt at one.
I didn't use a pattern and since I only know how to chain and treble stitch, that's what I did.
Perhaps not as exquisite as Margaret Oomen's beauties but I think I did ok. And it's just perfect for posing with an illustration from a beautiful vintage book of Australian wildflower illustrations by Patricia Weare. I discovered this book in a thrift store not so long ago - it was a nice find!
I think this one will be destined for a lovely little display on my craft room window sill. I have two more similar pebbles and some different coloured thread...but perhaps I should learn a few more stitches first.
Monday, August 16, 2010
Almost there!!
I have two more rows of fourteen squares to go before it's time to start stitching it all together!!
Friday, June 18, 2010
Snail Mail
Here's some old fashioned kind of fun!
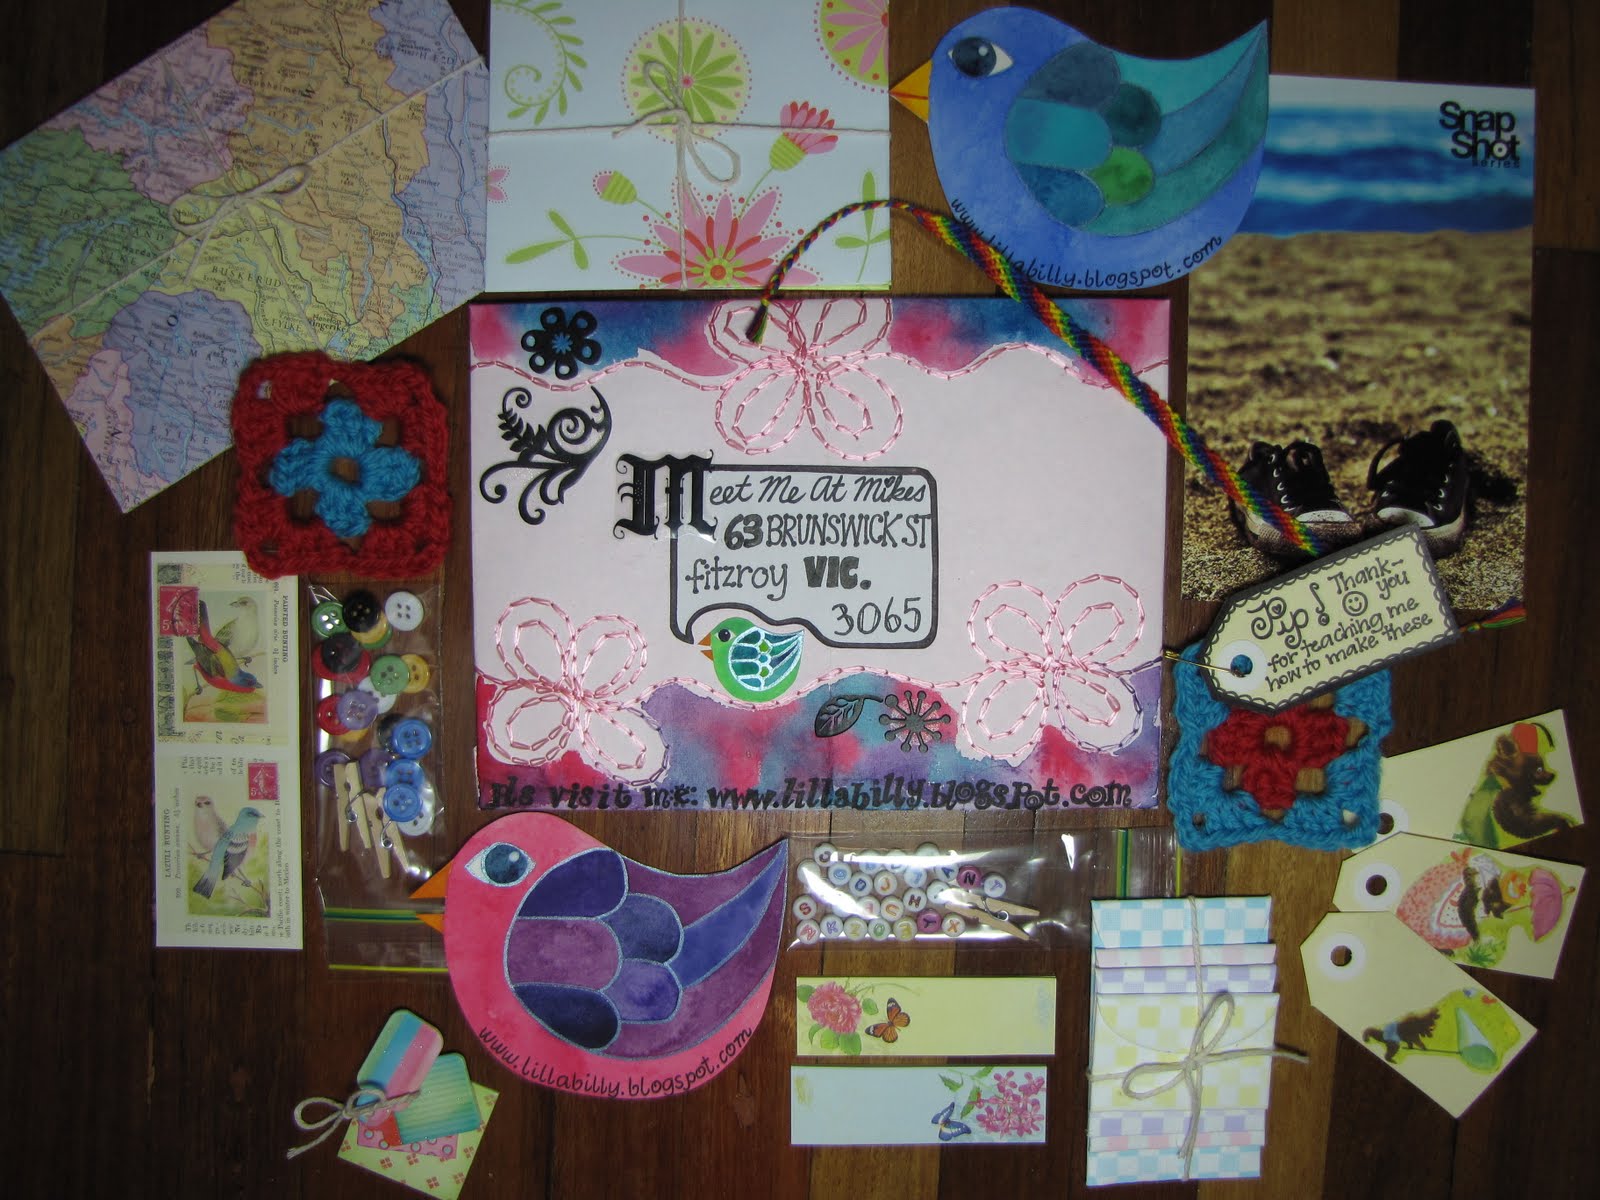
Pip from Meet Me At Mikes is holding a lovely competition wherein you send her an envelope full of crafty bits and bobs you happen to have lying around. She will take photos of the envelope and contents as they come in and all the envelopes will be hung in the window display of her shop. You can be as crafty or as quick with your envelope and contents as you like. At the end of the competition, she will randomly draw one envelope and that person will get ALL the crafty goodies!! Score! If you want more info, just click on the button in my sidebar. (WOW. A button. In a sidebar. I actually sound like I know what I'm doing around here!)
So anyway, I just couldn't resist this. It takes me way back to being a kid and posting all sorts of stuff in lumpy envelopes to pen pals and school friends! Did you ever do that? And it was so much fun receiving something back. Sadly, I don't have any pen pals anymore but I aim to change that soon...more on that later.
Anyway, it took me all week to sort out my envelope and troll through my mountains of crafty goodness (read: mess) to find things that would fit in my envelope. Then I got all creative and made things too!! There is even a tiny note for Pip - I hope she gets it! I know I could have just chucked it all in a postpak but being me I had to create a perfect envelope and make it extra beautiful. After all, people would be seeing it! Yes, people!! My brain might just leak out my ears if I sent in anything less that something extra special! Eeeeeee! Ha ha...ahem.
So, I really hope it gets to Fitzroy in one piece without having bits ripped off it or getting torn apart in Australia Post's sorting machines! (Do they have sorting machines? Who knows!)
So just in case, here's a little record of my envelope and all the lovely stuff inside...I hope whoever wins loves it all!
The front side of the envelope...I made the envelope from some lovely stitched wrapping paper I had. The big "M" was from a pack of el cheapo rub on's that wouldn't! So I just cut it out and glued it instead. Just in case anyone thinks I don't know how to use them, I really, actually do! Also, now I'm way too smart to buy rub ons from cheapy stores.
Next, the envelope and all the delicious crafty stuff...the things I made myself are the two handpainted birds, two granny sqaures in my fave colour scheme of the moment, three bears gift tags, map envelopes and giftwrap envelopes (tied with string...arn't things so much lovlier when they are tied with string?) and a rainbow friendship band. Other contents include a postcard (of Converse shoes, I have me a craving for buying a pair!), a set of four tiny envelopes (again with the string!) 2 sets of butterfly sticky tags (great for marking magazine pages and recipes with), a little bag of alphabet beads (one of each letter) and a tiny peg, set of four pretty mini-tags, another little bag containing some buttons and two more pegs and finally, two bird stamp stickers. Phew!
Some close-ups...you can see my note (attatched to a granny square) and also the little "Three Bears" tags that I'm a bit sad to be sending away! Oh well, share the love and all that. Also, hopefully noone will think it dreadfully cheeky of me to plaster my blog URL over a few things. New visitors, ahoy!
Here's a better view of the Three Bears tags. I made them with some images from a Golden Book of The Three Bears I found the other day in a thrift shop for 50c. Some of the pages were torn inside so I didn't feel bad for chopping out these little pictures. Well not dreadfully bad anyway. Arn't they darling?
And here's a good view of the friendship band. Remember those? My hubby was incredibly impressed when he saw this and told me it "looks just like a real one!" Thanks, sweetheart...I think. I worked out that the last time I made one of these was 22years ago! Wow. Way to go making myself feel ancient.
Here's the back of the envelope...no, you don't get to see where I live : )
And some close ups of my watercolour birdies on the envelope. While I was inking in the outline of the wing on one of the first ones I did, I put a HUGE blot of ink on it and had to redo the entire thing! They are a bit fiddly when they are this tiny.
Here's the envelope stuffed full...
And finally, sealed and ready to go. Hopefully I havn't included any crumbs off the floor from the photoshoot.
I had to glue that sucker shut so I sure hope Pip and her helpers have a sharp letter opener to split the top of it with, otherwise I have no idea how they will get inside!
Hooray for all that envelopey fun!!
Pip from Meet Me At Mikes is holding a lovely competition wherein you send her an envelope full of crafty bits and bobs you happen to have lying around. She will take photos of the envelope and contents as they come in and all the envelopes will be hung in the window display of her shop. You can be as crafty or as quick with your envelope and contents as you like. At the end of the competition, she will randomly draw one envelope and that person will get ALL the crafty goodies!! Score! If you want more info, just click on the button in my sidebar. (WOW. A button. In a sidebar. I actually sound like I know what I'm doing around here!)
So anyway, I just couldn't resist this. It takes me way back to being a kid and posting all sorts of stuff in lumpy envelopes to pen pals and school friends! Did you ever do that? And it was so much fun receiving something back. Sadly, I don't have any pen pals anymore but I aim to change that soon...more on that later.
Anyway, it took me all week to sort out my envelope and troll through my mountains of crafty goodness (read: mess) to find things that would fit in my envelope. Then I got all creative and made things too!! There is even a tiny note for Pip - I hope she gets it! I know I could have just chucked it all in a postpak but being me I had to create a perfect envelope and make it extra beautiful. After all, people would be seeing it! Yes, people!! My brain might just leak out my ears if I sent in anything less that something extra special! Eeeeeee! Ha ha...ahem.
So, I really hope it gets to Fitzroy in one piece without having bits ripped off it or getting torn apart in Australia Post's sorting machines! (Do they have sorting machines? Who knows!)
So just in case, here's a little record of my envelope and all the lovely stuff inside...I hope whoever wins loves it all!
The front side of the envelope...I made the envelope from some lovely stitched wrapping paper I had. The big "M" was from a pack of el cheapo rub on's that wouldn't! So I just cut it out and glued it instead. Just in case anyone thinks I don't know how to use them, I really, actually do! Also, now I'm way too smart to buy rub ons from cheapy stores.
Next, the envelope and all the delicious crafty stuff...the things I made myself are the two handpainted birds, two granny sqaures in my fave colour scheme of the moment, three bears gift tags, map envelopes and giftwrap envelopes (tied with string...arn't things so much lovlier when they are tied with string?) and a rainbow friendship band. Other contents include a postcard (of Converse shoes, I have me a craving for buying a pair!), a set of four tiny envelopes (again with the string!) 2 sets of butterfly sticky tags (great for marking magazine pages and recipes with), a little bag of alphabet beads (one of each letter) and a tiny peg, set of four pretty mini-tags, another little bag containing some buttons and two more pegs and finally, two bird stamp stickers. Phew!
Some close-ups...you can see my note (attatched to a granny square) and also the little "Three Bears" tags that I'm a bit sad to be sending away! Oh well, share the love and all that. Also, hopefully noone will think it dreadfully cheeky of me to plaster my blog URL over a few things. New visitors, ahoy!
Here's a better view of the Three Bears tags. I made them with some images from a Golden Book of The Three Bears I found the other day in a thrift shop for 50c. Some of the pages were torn inside so I didn't feel bad for chopping out these little pictures. Well not dreadfully bad anyway. Arn't they darling?
And here's a good view of the friendship band. Remember those? My hubby was incredibly impressed when he saw this and told me it "looks just like a real one!" Thanks, sweetheart...I think. I worked out that the last time I made one of these was 22years ago! Wow. Way to go making myself feel ancient.
Here's the back of the envelope...no, you don't get to see where I live : )
And some close ups of my watercolour birdies on the envelope. While I was inking in the outline of the wing on one of the first ones I did, I put a HUGE blot of ink on it and had to redo the entire thing! They are a bit fiddly when they are this tiny.
Here's the envelope stuffed full...
And finally, sealed and ready to go. Hopefully I havn't included any crumbs off the floor from the photoshoot.
I had to glue that sucker shut so I sure hope Pip and her helpers have a sharp letter opener to split the top of it with, otherwise I have no idea how they will get inside!
Hooray for all that envelopey fun!!
Monday, May 10, 2010
Pip's Craft Challenge
Pip from Meet Me At Mikes set a lovely little craft challenge here a little while ago. I'm joining in! And you can too! (In the words of Pip herself, "Yes, you can!") Thanks to her awesomely easy to understand video tutorials, I learnt how to crochet a granny square in less than two afternoons. Ok, my first one was completely wonky ( I blame the loosely woven wool I was using, cause it surely couldn't have been the fact that it was my very first time, right?) but since hunting out some new stuff (thanks Spotlight for having a yarn sale just when I needed it) I've been grannying away and now my five year old is expecting a blanket to keep herself snug in bed by the time winter arrives!! Eek! I better get crocheting!
Subscribe to:
Posts (Atom)