Showing posts with label links. Show all posts

Wednesday, October 5, 2011

Muesli Squares

Have you ever made your own muesli bars?  If not, you should try!  It's super easy and you can put in whatever grains, seeds, nuts or fruit you like!  Or leave them out if you don't like.  It's really versatile and the combinations are as limited as your imagination and taste buds will allow.

I found my recipe here, but I changed it to suit my own ingredients because while I was cleaning out my pantry recently, I discovered this...


I think I may have bought it at the beginning of the year with lots of good intentions to start eating a nice healthy breakfast (it is awesomely delicious mixed with greek yoghurt and fresh blueberries), but somehow it got pushed to the back of the cupboard and forgotton.  Since the best before date is the end of the month, I figured there was no way I could slog through a whole box of muesli  in a few weeks, so muesli bars (or squares, in my case) would be perfect!

Instead of including a whole heap of seperate dry ingredients, I simply added up the amount needed in the original recipe (five cups), used the muesli (which came to four cups) and topped it up with the last of Miss Six's cornflakes, the last of a packet of craisins (dried cranberries) and some extra sultanas to make the five cups.  Not only did I get some yummy muesli treats, but I got more space in my pantry too!

So here's my recipe...

Homemade Muesli Squares


Ingredients

5 cups of dry ingredients (cereal, grains, dried fruits, seeds, nuts, whatever you like)
125g unsalted butter
1/2 cup honey
1/3 cup brown sugar

Method

1. Preheat oven to 180 degrees.  Grease and line a 3cm deep, 16cm x 28cm (base) baking pan with baking paper. Cook your dry ingredients (without fruit, although I didn't bother seperating the stuff that was already in the muesli) in a frying pan over medium heat, stirring, for 8 to 10 minutes or until golden.


Transfer to a bowl. Set aside to cool. Stir in dried fruit if you are adding extra.

 
2. Cook butter, honey and sugar in a small saucepan over medium heat, stirring, for 3 to 4 minutes or until sugar dissolves. 

Bring to the boil. Reduce heat to low. Simmer, without stirring, for 7 minutes or until mixture forms a soft ball when a little is dropped into ice-cold water. Add to dry ingredients. Stir until combined

3. Spoon mixture into pan. Use a large metal spoon to press down firmly.


Cook in oven for 5-7 minutes.  Allow to cool. Cut into squares - it may still be quite soft but will harden up a bit on refridgeration. Store in an airtight container (I put baking paper between layers to stop the pieces sticking together)  in the fridge.

Obviously these are designated snackage for myself and the hubby as the muesli I used is not nut-allergy friendly for Miss Six (it has almonds, which she is actually not allergic to, but just in case) so I am working on a nut free version for her to take in her lunchbox to school.

Here's the finished product with a little more blue/green love and a sneek peak of my latest crochet project.


Yum!  If you'd like some more baking inspiration, head on over to the girls at A Spoonful Of Sugar for some yummy ideas and links to which you can add your own delicious treats!
Happy baking!

Monday, March 28, 2011

More Street Art - "Street Fonts" by Claudia Walde

Do you know what I've been loving for quite some time now?  Text as artwork.  There's been lots of it in the interior design world - a huge interest in decoration containing fonts, alphabets and writing. I've even considered printing out and and framing my very first post ...I can't help but smile when I see it and I have the perfect spot!

So if interiors arn't your thing and you havn't a clue what I'm going on about, here's some examples of what's been happening in interior decor for the last couple of years:

Bus rolls:
Image via Desire to Inspire


The iconic "Keep Calm and Carry On":

Image via Manalo For The Home


Appropiate words in appropriate places:

Image via Manalo For The Home


 Favourite song lyrics:
Image via theloveshop on Etsy


Letters and initials:

Image via Design Sponge
And of course, alphabet posters.  Even Ikea has one:

Image via Ikea


Wow! Lots of inspiration there, right?

Well, you probably have already guessed that I'm quite attracted to graffiti art and for those of you familiar with graffiti and street art, you will know it can take many forms, though the origins of graffiti have always been centred around letters and writing. Just see my last post. (And if you're not familiar, you are now living evidence of the phrase "You learn something every day"  Hooray, you!)  

I have been thinking recently about making some artworks for my home combining all these things and so, to invite some major inspiration, have been waiting with absolute bated breath for this to arrive on my doorstep:


And it's finally here!   It's "Street Fonts" by Claudia Walde and boy, oh, boy, it was just as good as I thought it was going to be.

One hundred and fifty-four very creative artists - all with roots in graffiti culture - were given the same brief, according to the foreward;

"... to design all twenty six letters of the Latin alphabet.  How they approached this task and selected the media with which to express their ideas was entirely up to them."

And they are pretty amazing!!
Here's a sneak peek at some of the images.  Some of the styles are very traditional old school graffiti-esque:

by Atom One from Dortmund, Germany

by Bonza from Strasbourg, France
by Jorz from Melbourne, Australia
While some are more design, font and typography oriented.  I think this would make a pretty cool framed print:

by Aske from Moscow, Russia  


These next two take the cake for cuteness:

by iLK from Paris, France


by Popil from Shanghai, China


 And I simply cannot stop looking at these ones for their cool black and white graphic complexity:

by Casper from Osaka, Japan


by L'Atlas from Paris, France
by Xpome from Sofia, Bulgaria

Then there are the ones that are fabulously ace works of art in their own right.  Paism used 246 nails and yarn to create this alphabet:

by Paism from Gryfice, Poland


And Ripo, originally from New York City but now living in Spain, used white enamel paint on mirrors to create his alphabet.  He then put up the mirrors on the streets of Barcelona and took pictures of the reflections.

by Ripo from New York City, USA
He explains the concept thus: "Graffiti usually fills in the "negative" or forgotton spaces of cities - ignored parts of signs, doors, walls...I played off this concept by painting in the negative spaces of the letters and letting the city fill in the rest."


Detail from alphabet by Ripo


WOW, right?  Very clever and really unexpected, don't you think?

So which is your favourite?  Does this make you see graffiti and street art in a different light?  Do you have letters or writing or alphabet prints adorning the walls your home?  I'd love to hear about it if you do.

Now I'm off to browse through my new book really carefully and soak up all that lettery goodness!

Wednesday, November 3, 2010

Art

I have just stumbled on this beautiful little vid through the blog of one of my lovely, lovely followers, Tara, and I had to share it with you all.  I think you should head on over to Tara's blog On A Branch to read what she has to say about creating art as an adult when you havn't for some time.  I could definately relate and I'm sure many of you will be able to as well.

When I was little, I used to spend hours on end drawing and colouring and painting.  There was nothing quite like the smell and excitement of new art materials, be they paints, pens, crayons or colouring pencils.  I remember that if I ever got a new set I would have to try out every colour on a "test paper" before I could even contemplate creating a piece of art from them.  I'm pretty lucky to have a creative mother who knew the benefit of good quality art materials and provided such, though they were still pretty basic.  At least I was completely spared of felt pens which run out after five strokes, pencils which break as you sharpen them and paints that come out with colours that are thin, muddied and insipid.  I remember my Dad bringing home big reams of continuous computer paper (the kind that had blue stripes on one side, a perforation between each sheet and holes all the way down each edge for the grippers on the printer) from his work and these reams used to take pride of place on the corner of my desk so that I could tear a piece off and create as the mood took me.  I remember loving the smell of the art room when I was in primary school but hating the thick brushes that they provided which were always gummed up with old paint and only ever created thick blobby marks on the paper.  I also remember being completely envious of my best friend's super dooper brand new Crayola Caddy!!  Do they still make those?

Did you used to draw and paint as a child? What did you love about it?  What didn't you love?  Do you still create?


Friday, July 30, 2010

Friday Lunchbox #1

In an effort to inspire myself a little more when making my daughter's school lunches, thus begins "Friday Lunchbox".  Hope you feel inspired too!

Here is today's...


Morning Tea - fresh strawberries, stove popped popcorn (gotta love those Nude Food Movers containers)
Lunch - Stromboli and banana (yes those are butterfly and flower stickers on that banana, Miss 5 gets all excited when she finds those)
Drink - Water (not pictured)

The stromboli recipe comes from this book...


...which I picked up a number of years ago at one of those discount book places that pop up in the middle of shopping malls every now and then.  Basically a stromboli is like a pizza which is rolled up, baked and sliced.  YUM!

Here's how you make it.

Stromboli

Easy Bread Base Ingredients
2 tspn dried yeast
1 cup plus 2 tblspn warm water
2 tspn sugar (I used caster sugar)
1 tspn salt
2 tblespn olive oil
3 cups of high grade/bread flour

Method
Preheat oven to 200 deg C.
Measure the first 5 ingredients and 1 cup of flour into a large bowl.  Mix until well combined.  Cover bowl and leave for 15 minutes.  Stir in remaininig flour (adding extra if necessary) to make dough just firm enough to knead.  Knead for 10 minutes, then return to bowl, cover and rise in a warm place until doubled in size.


Roll dough into a very large thin rectangle (sorry about the poor picture quality here, it was a gloomy day and the indoor lights just didn't cut it!)


Top like a pizza (use toppings SPARINGLY).

I used a sachet of Fountain Pizza Sauce, about 1/4 red capsicum, 1 mushroom, 1/2 brown onion, 10 kalamata olives, fresh basil, Masterfoods "Italian Dried Herbs" and about a half cup of grated cheddar cheese.  I chopped the capsicum, mushroom and onion very finely as Miss 5 won't eat them if they are chunky, whereas she loves the olives in bigger pieces.


Before the cheese...


After the cheese...

Roll the dough up and press any openings firmly shut.  Slash the top diagonally to prevent splitting, then bake for 20-30 minutes or until golden.  If it is cooked all the way through, the stromboli should sound hollow when you tap it on the top.

Before cooking...

After...

You can see it's a little mishapen on the left side near the base (toward the top of the photo) - it actually split a little.  I will make the cuts on top a bit deeper next time as the ones I made just seemed to seal up rather than open to let the heat and moisture out.  It was no biggie though - as I didn't overstuff the inside, not much came out.

And here is the final product...


It's completely delicious and despite my dodgy oven, an absolute success - the bread is lovely and soft (kneading the full 10 minutes really helps here) and I know I'm going to have lots of fun experimenting with the fillings.

If you get the time, do try it - I'd love to hear how you go!

Thursday, July 22, 2010

The Book Depository, Awesome Book Haul and Great Blogs to Check Out!

Have you heard about the Book Depository?  If you love books and have (like me, until recently) never heard of them, then you should definately check them out!!  While I always try my best to buy locally, books are such a luxury item for me that I'm happy to go with what's cheapest.  And although it's a UK site, not only can I view my purchases in Aussie dollars, they also offer free worldwide shipping!!

The prices are pretty fantastic too - everything I've purchased so far is at least around half the price of what I would have spent if I'd hopped in my car, driven to the local shopping centre, physically walked into a bookstore and purchased the books myself.  While I don't get that instant gratification factor, it is heaps of fun to have the delivery guy turn up in a big van when you least expect it and drop a parcel of lovely books on the doorstep!  They are pretty prompt (both my previous deliveries have taken around a week or so) and did I mention the free worldwide shipping??  They don't have many reviews on the site and no "Look Inside" feature like Amazon so since my book purchases are something that I tend to agonize over I usually check out the books thoroughly on Amazon or in person in a bookstore before purchasing through them.

Here's a pic of my most recent haul...


I'm laughing at the nanna-ish-ness of The Australian Women's Weekly "Easy Baking" but I had actually borrowed a slightly more modern looking version of it from my local library only to have to give it back when I went to renew as someone else had placed a hold on it. (Am I the only person who always forgets to return library books until they receive an overdue notice in the mail?  Whoops!)  And I'd only managed to find time to make a few of the recipes!! (Oooh that coconut lime slice...YUM!)  And I totally can't wait to use those great Cath Kidston stickers and stationery...there is just not enough snail mail happening in the world these days.  Also, something else there is not enough of - FREE WORLDWIDE SHIPPING!!!  Hahahahaha...hmmmm.

Moving on, I've also added a couple of great blogs in my sidebar under "Home and Children". There they are, down the screen on your right hand side!  Or, if you are feeling lazy, in the next sentance! They are "Made by Joel""SouleMama" and "Mini eco".  I've been visiting them for a long time now as they always have wonderful, creative and inspirational stuff to share.  If you work with or have your own young children, they are all worth a visit and a good browse!  Let me know what you think about them - I'm pretty sure you'll be bookmarking them in no time!

ENJOY!

Edited to add: I just received an email from the Book Depository - they are looking for new customers and will send a 10% off voucher to anyone I refer via email while they are holding their birthday celebrations.  This is a limited offer so if you'd like a 10% off voucher to try them out, pop your email in the comments section and I will sign you up.  They will not keep your email address or bother you with spam after they've sent your voucher 'cause they're nice like that.  And I'd really love you to use it 'cause for every voucher that gets used, I get sent a voucher too!!  So PLEEEEEASE try them, you'll be pleased with the great prices and service AND you'll be helping out my book addiction too!!

Friday, June 18, 2010

Snail Mail

Here's some old fashioned kind of fun!

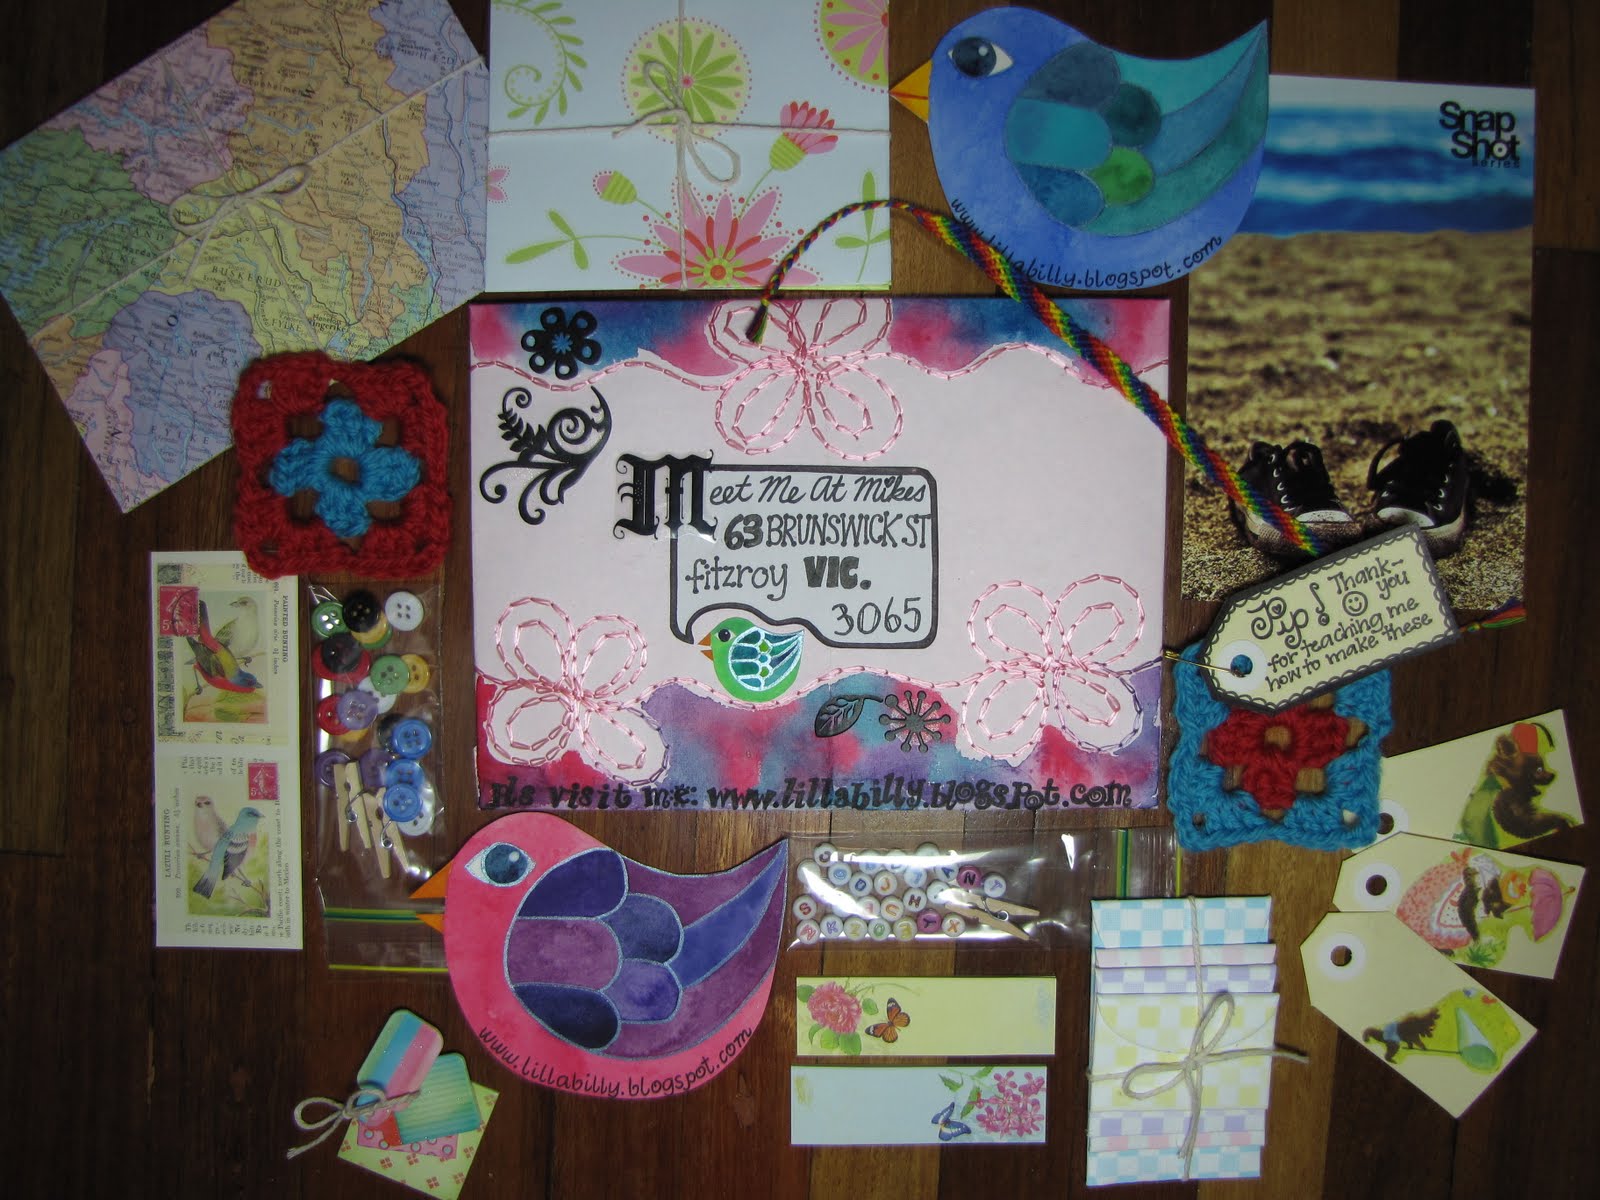
Pip from Meet Me At Mikes is holding a lovely competition wherein you send her an envelope full of crafty bits and bobs you happen to have lying around.  She will take photos of the envelope and contents as they come in and all the envelopes will be hung in the window display of her shop.  You can be as crafty or as quick with your envelope and contents as you like.  At the end of the competition, she will randomly draw one envelope and that person will get ALL the crafty goodies!!  Score!  If you want more info, just click on the button in my sidebar.  (WOW. A button.  In a sidebar.  I actually sound like I know what I'm doing around here!)

So anyway, I just couldn't resist this.  It takes me way back to being a kid and posting all sorts of stuff in lumpy envelopes to pen pals and school friends!   Did you ever do that?  And it was so much fun receiving something back.  Sadly, I don't have any pen pals anymore but I aim to change that soon...more on that later.

Anyway, it took me all week to sort out my envelope and troll through my mountains of crafty goodness (read: mess) to find things that would fit in my envelope.  Then I got all creative and made things too!!  There is even a tiny note for Pip - I hope she gets it!  I know I could have just chucked it all in a postpak but being me I had to create a perfect envelope and make it extra beautiful.  After all, people would be seeing it!  Yes, people!!  My brain might just leak out my ears if I sent in anything less that something extra special! Eeeeeee!  Ha ha...ahem.

So, I really hope it gets to Fitzroy in one piece without having bits ripped off it or getting torn apart in Australia Post's sorting machines!  (Do they have sorting machines?  Who knows!)

So just in case, here's a little record of my envelope and all the lovely stuff inside...I hope whoever wins loves it all!

The front side of the envelope...I made the envelope from some lovely stitched wrapping paper I had.   The big "M" was from a pack of el cheapo rub on's that wouldn't!  So I just cut it out and glued it instead.  Just in case anyone thinks I don't know how to use them, I really, actually do!  Also, now I'm way too smart to buy rub ons from cheapy stores.


 Next, the envelope and all the delicious crafty stuff...the things I made myself are the two handpainted birds, two granny sqaures in my fave colour scheme of the moment, three bears gift tags, map envelopes and giftwrap envelopes (tied with string...arn't things so much lovlier when they are tied with string?) and a rainbow friendship band.  Other contents include a postcard (of Converse shoes, I have me a craving for buying a pair!), a set of four tiny envelopes (again with the string!) 2 sets of butterfly sticky tags (great for marking magazine pages and recipes with), a little bag of alphabet beads (one of each letter) and a tiny peg, set of four pretty mini-tags, another little bag containing some buttons and two more pegs and finally, two bird stamp stickers.  Phew!


Some close-ups...you can see my note (attatched to a granny square) and also the little "Three Bears" tags that I'm a bit sad to be sending away!  Oh well, share the love and all that.  Also, hopefully noone will think it dreadfully cheeky of me to plaster my blog URL over a few things.  New visitors, ahoy!


Here's a better view of the Three Bears tags.  I made them with some images from a Golden Book of The Three Bears I found the other day in a thrift shop for 50c. Some of the pages were torn inside so I didn't feel bad for chopping out these little pictures.  Well not dreadfully bad anyway.  Arn't they darling?


And here's a good view of the friendship band.  Remember those?  My hubby was incredibly impressed when he saw this and told me it "looks just like a real one!"  Thanks, sweetheart...I think.  I worked out that the last time I made one of these was 22years ago!  Wow.  Way to go making myself feel ancient.


Here's the back of the envelope...no, you don't get to see where I live : )


And some close ups of my watercolour birdies on the envelope.  While I was inking in the outline of the wing on one of the first ones I did, I put a HUGE blot of ink on it and had to redo the entire thing!  They are a bit fiddly when they are this tiny.


Here's the envelope stuffed full...


And finally, sealed and ready to go.  Hopefully I havn't included any crumbs off the floor from the photoshoot.


I had to glue that sucker shut so I sure hope Pip and her helpers have a sharp letter opener to split the top of it with, otherwise I have no idea how they will get inside!

Hooray for all that envelopey fun!!

Wednesday, June 9, 2010

Bluebird Russian Giveaway

Today I had a little spare time so decided to go web surfing in the hopes of discovering new and exciting stuff.

And I happened upon a lovely little giveaway at Bluebird Russian .  Don't you just love giveaways?  I have never won one yet but it's exciting to try and you have to be in it to win it!

 So get on over there - leave a comment and a link on your blog and you just might win one of these darling clips (if I don't win first!! )

; )